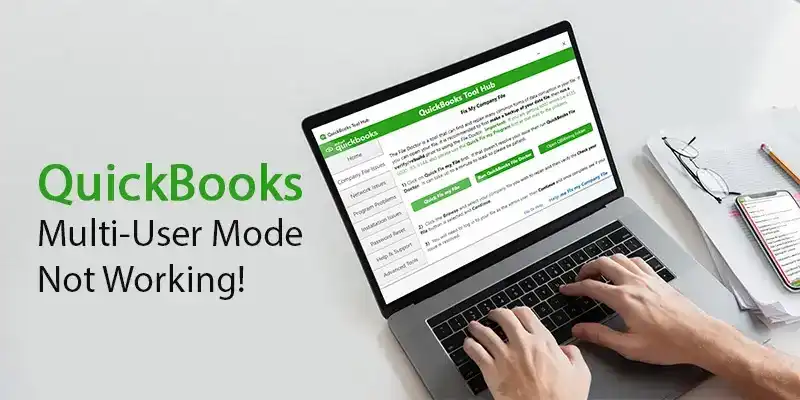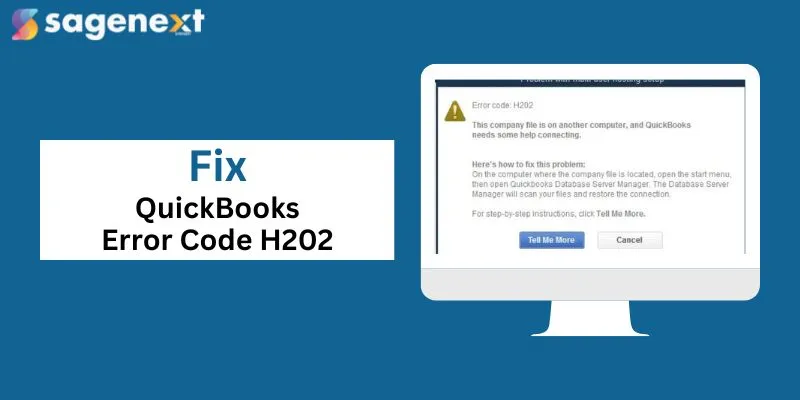
Fix QuickBooks Error H202 When Switching Multi-user Mode
QuickBooks users often report receiving the error code H202 when switching to multi-user mode. In most cases, this error occurs if the multi-user connection on your server computer that stores QuickBooks Company files has been disabled.
Plus, the inability to communicate with the server computer will prevent you from accessing the QuickBooks company file.
What is QuickBooks Error H202
QuickBooks error H202 arises when QuickBooks Desktop attempts to connect to a company file stored on another computer but fails due to issues with the multi-user hosting setup, multi-user mode is disabled on the server or workstations, and if the hosting configuration settings are incorrect.
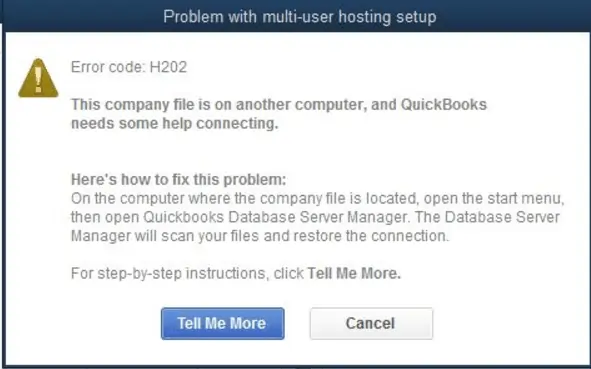
The QuickBooks Error code: H202 appears on the screen and states that “This company file is on another computer, and QuickBooks needs some help connecting”, but this copy of QuickBooks cannot connect to the server (H202)”.
Read this also: How to Solve Multi-user Mode Not Working
Causes Of QuickBooks Error H202
- Problem With Multi-user Hosting Setup
- Incorrect Hosting Configuration
- Firewall Blocking Communication
- DNS Server Conflict
- QuickBooks Services Not Running
- Corrupted Network Data File
In most cases, the error indicates that the multi-user connection to the server is blocked, so QuickBooks cannot access the file.
Solutions to Fix QuickBooks Error H202
There are several solutions available for resolving the QuickBooks Error H202 that are some solutions.
Solution 1- Test the Network Connectivity
Follow the steps for testing the network connectivity:
1: In the system where you receive error code H202, open the ‘Run‘ window by pressing (Windows+R keys).
2: Type CMD in the box and click the option of ‘OK‘.
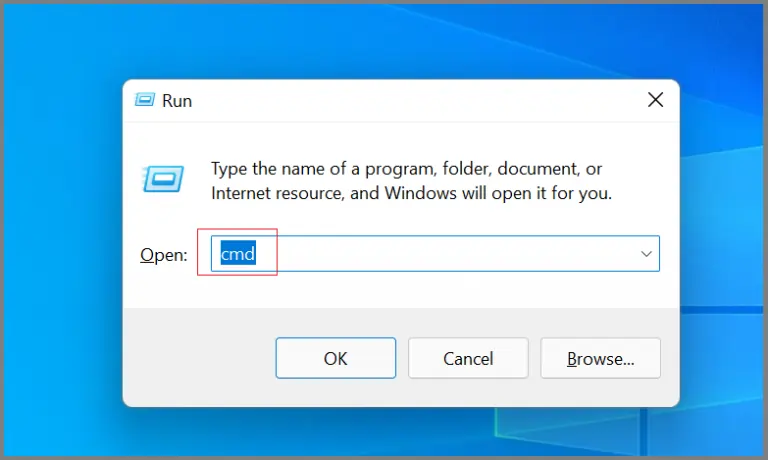
3: After that, ping your server from your computer.
4: In this step, type ping server name and click the Enter key.
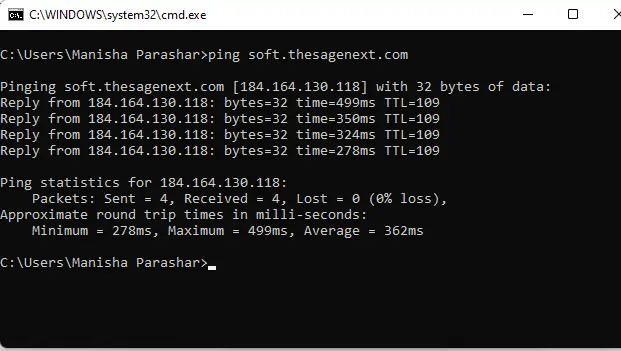
Note: In case, the response you receive is slow or you lost a packet, then there might be some issue with the network and a repair is needed.
Solution 2- Utilize QuickBooks File Doctor
QuickBooks File Doctor is a useful tool for diagnosing and fixing multiple types of QuickBooks errors. This tool is available for download (if not already downloaded) from Intuit’s official website.
1: Download and install the QuickBooks File Doctor Tool.
2: Select the “Company file issues” in the QuickBooks tool hub.
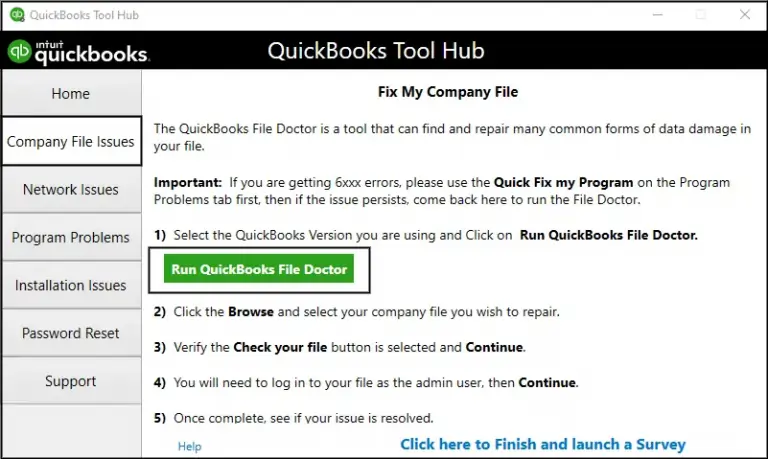
3: Choose the company file from the drop-down menu. Click Browse and search to locate the file if you are unable to identify it.
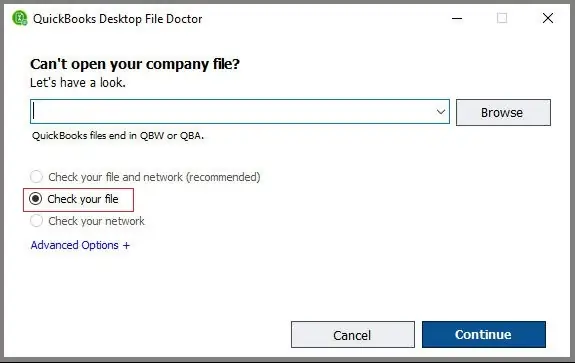
4: Once it’s finished, hit a click on the check box for your file and then click on Continue.
5: Enter the QuickBooks admin password and then select the ‘Next’ option.
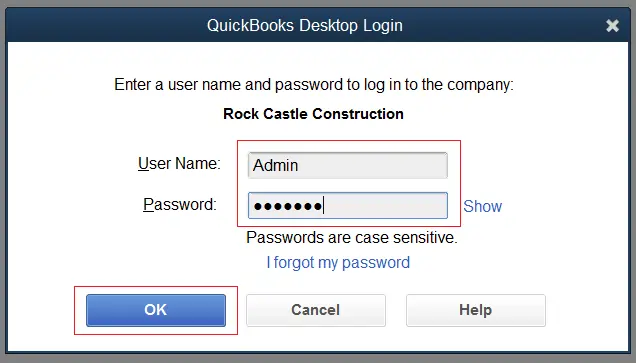
At the end of the day, it should be noted that the scan time depends on the size of the file, and in most cases, it might take up to five minutes. Once the scan is complete, you should open the QuickBooks software and company file.
Also read: Updated Features in QuickBooks Software
Solution 3- QuickBooks Database Server Manager Installation and Use
Follow the steps below to install and run QBDBSM:
1: Open the ‘Window Start Menu’ on your server.
2: Type in the word ‘Database‘ in the search field.
3: Choose the QuickBooks Database Server Manager on the list.

4: Look for the folder that contains company files. Using the browse feature, you can find this folder as well.
5: Click on the ‘Start Scan Button’.
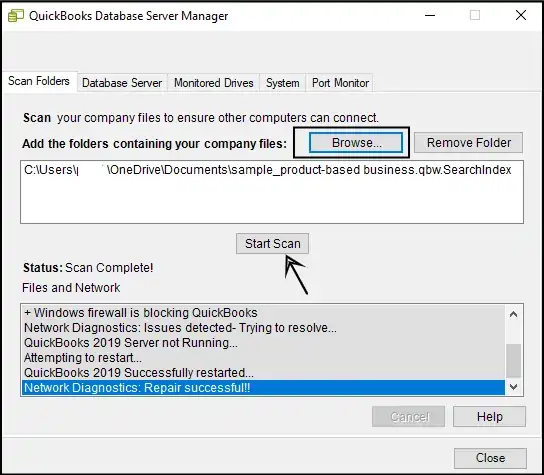
Note: With QuickBooks Database Server Manager, you can fix system Firewall settings.
6: After the scanning, click the ‘Close‘ button.
Note: QuickBooks should be opened on each workstation that shows the error.
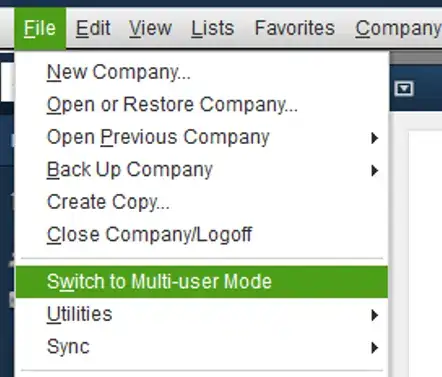
7: Move to ‘File Menu‘.
8: Click on the option of ‘Switch to Multi-user mode.

After you’ve implemented the solution, you’ll be able to use QuickBooks in multi-user mode, and if it still doesn’t work, move on to the next solution or procedure.
Solution 4- Verify QuickBooks Services
You can initiate multi-user hosting mode if the server is running a full version of QuickBooks.
1: Open QuickBooks while on the server.
2: Select File, then Utilities.
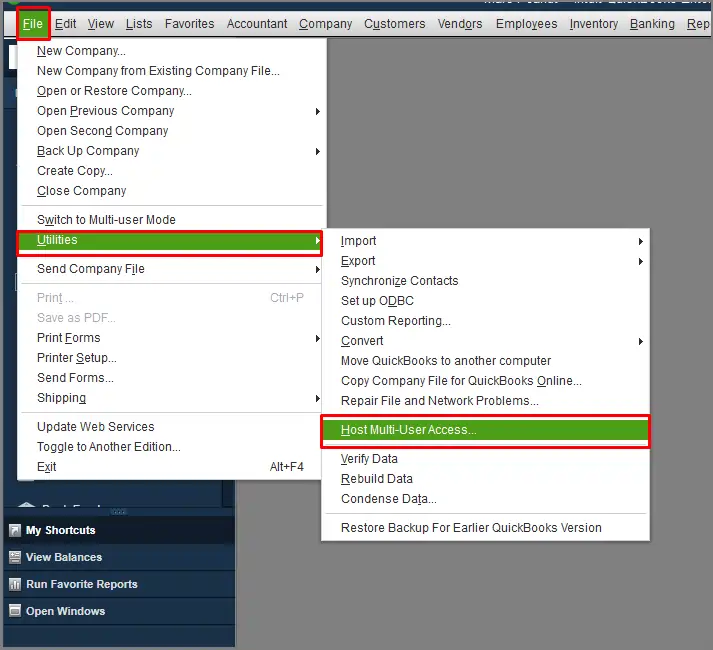
3: Select Host multi-user access from the drop-down menu.
4: To check the status of QBCFMonitorService and Quickbooks DBXX on the server, follow the instructions below.
- Activate the Run window.
- In the text area, type services.msc and press the OK key.

5: Choose QuickBooksDBXX and check whether the Startup type is Automatic or Manual.
Note: Make sure the Startup type is set to Automatic if it isn’t already and check the status of the service and make sure it says it’s up and running.

6: Select Recovery from the Recovery tab.
7: From the drop-down boxes for the first, second, and subsequent failures, Choose to restart the service of all these failures.
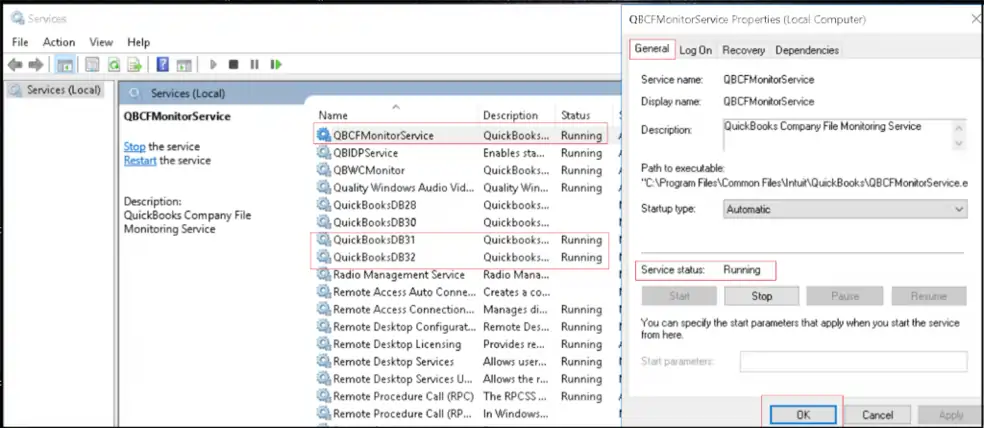
8: Press the Apply and then OK buttons.
9: Complete all of the actions listed above For QBCFMonitorService.
Solution 5- Add the Services QuickBooksDBXX and QBCFMonitorService to the Admin Group
1: Allow Windows admin access to QuickBooksDBXX and QBCFMonitorService on the server.
2: Make sure that these services have admin permission if they don’t already have it, since this may help to resolve QuickBooks Error Code H202.
3: Check to see if the accounting software can be used in a multi-user manner. Otherwise, proceed to the next solution.
Solution 6- Setup the System Firewall
Sometimes your system firewall might block data exchange between QuickBooks and the server.
1: Generate exceptions for system firewalls in the system.
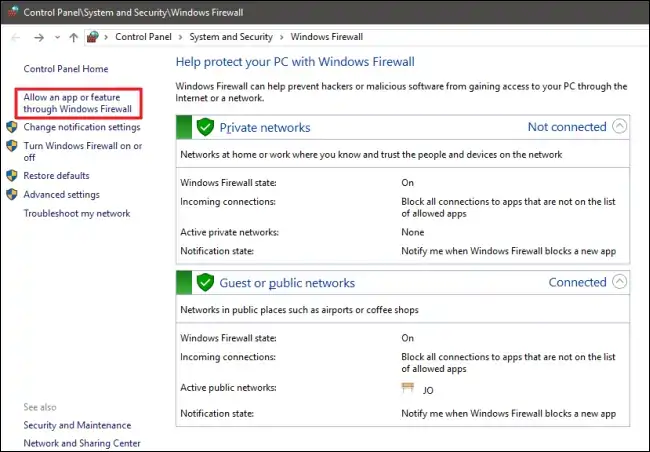
2: Make sure to change the system firewall permissions and install QuickBooks on all computers.
3: Hit ‘Switch to multi-user mode‘ in the File Menu.
Solution 7- Navigate to Windows Host File and Add on the Server
Step 1: Close all QuickBooks windows.
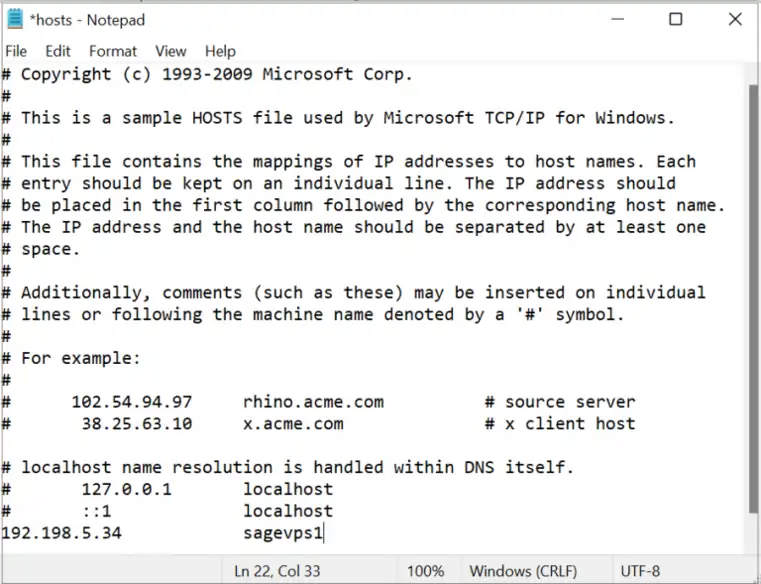
Step2: Follow the path C:\Windows\System32\Drivers\Etc or C:\Windows\Syswow64\Drivers\Etc on the server.
Step 3: Double-tap on the host file and select Notepad from the list of programs.
Step 4: Type the IP address and then the name of the computer. Enter the IP and name of the computer for the server.
Note: To separate the computer name and IP address, hit the Tab key on your keyboard rather than the Space bar.
Step 5: Do check if the error has been fixed by opening QuickBooks in multi-user mode.
Solutions 8- Create a New Folder for the QuickBooks Company File
- Create a new folder on the server.
- Make sure to apply the changes in the permissions of this new folder and then share the QuickBooks company files.
- Copy the .qbw file to the new folder.
- In multi-user mode, you can easily open your company file.
Solution 9-Installation of Diagnostic Tool by using QuickBooks
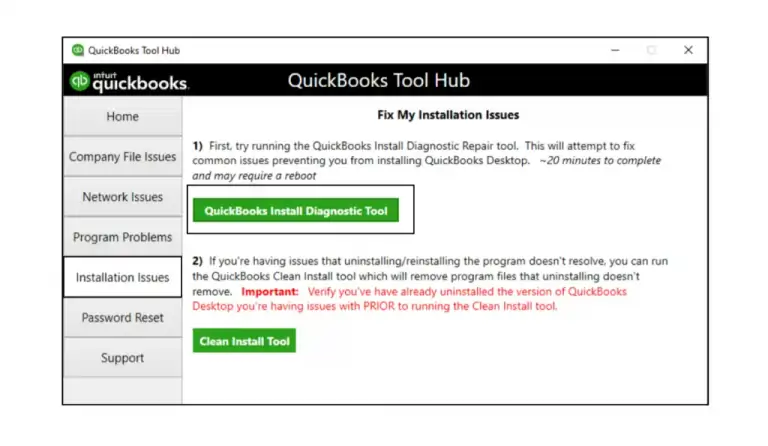
- Download and install QuickBooks Install Diagnostic Tool.
- Run a scan where a data file is located.
- Note down the number of IP addresses and network interfaces.
- Open the QuickBooks ports in the firewall status section if there is a tab for open ports.
- Navigate to the data file connectivity option.
- In the last step, try to open the company file and ensure that the error has been fixed.
Solutions 10- Set the Hosting Tool To Local Files
You have to ensure that no other client system tries to host the same company file.
Follow the steps involved in the process:
Step 1: Press the F2 key to open the product information screen in QuickBooks software.
Step 2: Under local server information, select hosting to reflect local files only on the lower-left corner.

What Else Can You Do
If the above solutions are performed incorrectly, data can be lost. Hence, it is recommended that companies should always back up their data. If the problem remains the same despite following all of the above solutions, you can contact QuickBooks technical support.
Read Also: How to Fix QuickBooks Error H505?
Bottom Line
QuickBooks error code H202 is difficult to resolve. Meanwhile, with the appropriate solutions on your side, you can overcome it and other similar issues so that you can continue working on your QuickBooks financial transactions without interruption. This article has multiple options for resolving the QuickBooks problem H202.
If you are satisfied with the software and want to purchase it from the best solution provider, feel free to contact us. We are an Intuit authorized QuickBooks Solutions Provider and are dedicated to selling genuine Intuit products. You can also avail the expert consultations on which Intuit versions fit best your business needs. We serve our clients with the highest quality standards.
FAQs
Does turning off Host Multi-User Access fix QuickBooks Error H202?
Yes, it is necessary to turn off multi-user access on the host, if not, then do it on the workstations. Some systems on the network do not contain company files. Check to see if this option is enabled on the computer that is the server.
Is QuickBooks Tool Hub Able to Fix the QuickBooks Error Code H202
Yes, QuickBooks Tool Hub rectifies the Error with multiple solutions and you can easily install and download it on your computer.
What are the Symptoms of QB Error Code H202
Here are a few symptoms of Error code H202:
- QuickBooks has slowed down and occasionally freezes for a few seconds while working.
- You are unable to switch to multi-user mode.
- When the message of QuickBooks Error code appears on your computer screen.
- The whole system becomes inactive.
- It is not possible to open the company file on another computer.
What application is most likely to display error H202?
The application most likely to display error H202 is QuickBooks.


