If you are someone who is often required to transfer files and data online, chances are you must have heard about the term ‘FTP' (File Transfer Protocol) and their applications. FTP is a technology that has been around for decades, and today, completely revolutionized the way data and files are stored, accessed and transferred on the internet. This writeup has been drafted with intent to provide you with comprehensive information about FileZilla, one of the most popular FTP tools used across the globe.
What is FileZilla?
Developed by Tim Kosse, FileZilla is an open-source FTP (File Transfer Protocol) utility based on client-server architecture to help users transfer files from local desktops to web-based servers and vice-versa. Client-server framework is represented by two separate programs - FileZilla Server and FileZilla Client, both available under the terms of GNU General Public License for free. A paid version of the FileZilla FTP Client namely FileZilla Pro is also available for professional usages.
FileZilla Server can be defined as a web-based server that supports FTP, FTP over TLS (Transport Layer Security) as well as SFTP (SSH File Transfer Protocol) to grant secured and encrypted connections for file sharing. On the other hand, FileZilla Client is a fast and reliable cross-platform application that is available for Windows, Linux and Mac OS X with multi-language support. It works well with FTTP/1.1, SOCKS5, and FTP-Proxy modules along with being compatible with IPv6.
FileZilla Pro - a subscription-based FTP Client, is designed to cater to more demanding, commercial requirements, helping users manage and transfer huge sets of data and files with added support for cloud storage protocols. The software is specifically optimized for speed, and thus, allows users to configure and adjust the speed of the file transfer process as per their convenience. FileZilla Pro is compatible with all major OS and platforms along with supporting other advanced file sharing protocols like: Google Cloud, Google Drive, Amazon S3, Backblaze B2, Box, Dropbox, Microsoft OneDrive, OpenStack Swift, WebDAV, etc., which makes it one of the most advanced FTP applications in the open-source family.
Moreover, the software has some brilliant in-built features, like filename filters, network configuration wizard and synced directory browsing. The remote file search and editing option allows authorized users to search and edit files on virtual servers itself, making the whole process easy and convenient. Also, the users of the premium version have exclusive access to free technical support for quick troubleshooting and bug-fixing.
What is Filezilla Used For?
In simple words, Filezilla is used for uploading and downloading files to and from remote locations. With a simple yet intuitive graphical user interface (GUI), this innovative end-to-end FTP application provides easy and quick solutions to securely host data and exchange files. Even a layman with a little know-how about online file transfers can operate it. One can simply connect to the FTP server and use any FTP Client utility on any platform like Linux, Unix, or Mac to download the hosted files.
The FTP features a very powerful and user-centric utility in the form of Site Manager, which enables users to specify specific site parameters along with establishing connections with the targeted FTP Site. You can store entries and configure more parameters as compared to the QuickConnect.
What sets FileZilla apart from other file transfer programs is the fact that it is one of the only few applications with a special pause/resume feature. With FileZilla FTP Client and Server, you get the option to pause and resume the data transmission at any time instead of starting the process all over again.
How does FileZilla Work?
As explained above, FileZilla's working principle is based on client-server architecture - FileZilla Server and FileZilla Client (and FileZilla Pro); both having their own functionalities and working capabilities. Explaining further, the client program sends a connection request generally to port 21 of the server as per the protocol guidelines. This is usually called control connection, which is used for requesting and receiving commands and responses for file exchange between FTP Client and Server. These connections can be established in two ways:
i. Active Mode: In this, the Client establishes the command channel while the data channel is established by the server. The client sends connections to any of the ports to receive data from the FTP server. Client again sends the next port to the server, which is then acknowledged on the command channel.
ii. Passive Mode: In Passive Mode, the client utilizes the control connection to transmit PASV (Passive File Transfer Protocol) signal to the FTP server, which then reverts the IP along with the server port number. Unlike the Active Mode, both the command channel and the data channel are initiated from the client end.
Both Free and Paid versions of the FileZilla Client support Active as well as Passive FTP modes with the latter being active by default. It sends the login credentials via the control connection. The server then verifies and validates the entered username and password to deny or grant access for further proceeding. In case the access is granted, the client can send commands to the server, which ultimately evaluates user's permissions and runs download, upload, or delete commands accordingly. The commands take the form of a code followed by parameters.
It is to be noted that the FTP is not encrypted; all information including the username and password is transmitted in clear, plain text. FileZilla Client automatically uses FTPS and sends a warning message if the server doesn't support it. It works with both encrypted and unencrypted connections.
How to Download and Install FileZilla Server Windows?
FileZilla Server is very easy to download and install, and can be done on any internet-connected Windows-based PC.
Here's how to download and install FileZilla for Windows.
- Visit the official website of FileZilla or follow the link https://filezilla-project.org/download.php?type=server for Free FileZilla Server Download for Windows. As of now, the latest version of the application available for download is 1.1.0.
- Once the download is completed, run the install file (.exe) to configure and initiate the installation process. Proceed with the default Standard install type.
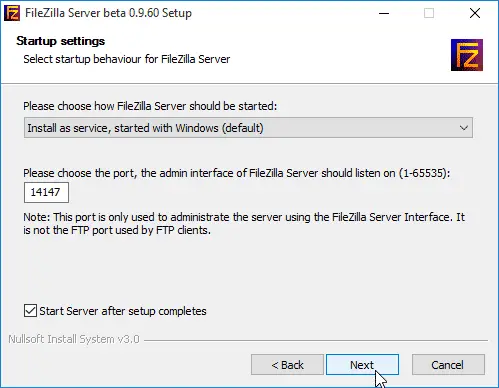
- Keep the Administrative port default.
- As for how you want the FTP server to start, Select "Install as service, started with Windows". It will automatically start the FileZilla Server whenever Desktop is turned on.
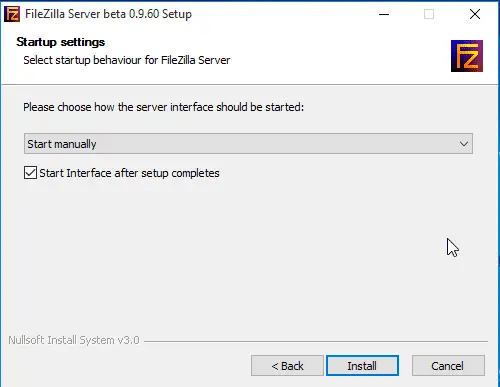
- Click "Start manually" feature for the Interface
- Launch FileZilla FTP Server by double clicking the icon on your desktop.
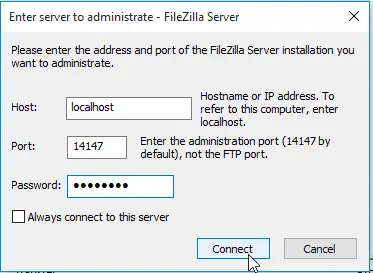
- The initial launch will prompt you to set up the FTP server. Keep the default setting of the Host (127.0.0.1) and FileZilla port Admin (14147) as it is. Enter a password that you will be requiring to manage the FileZilla FTP server. Once completed, click ‘Connect' to proceed to the next step.
- Now, you are required to configure the settings of the Passive Mode. Browse through Edit > Settings > Passive Mode settings, to configure the custom range of the port from 10100 to 10200.
- Go to Windows Firewall and define a new rule to only enable FTP port 21 and passive port range (10100-10200).
.webp)
_11zon.webp)
.webp)
How to Create a User Account on FileZilla FTP Server?
Once you are done with the FTP Server installation on your Windows PC, you are required to create an account to login and access the server. Given are the steps that you need to follow to create a user account:
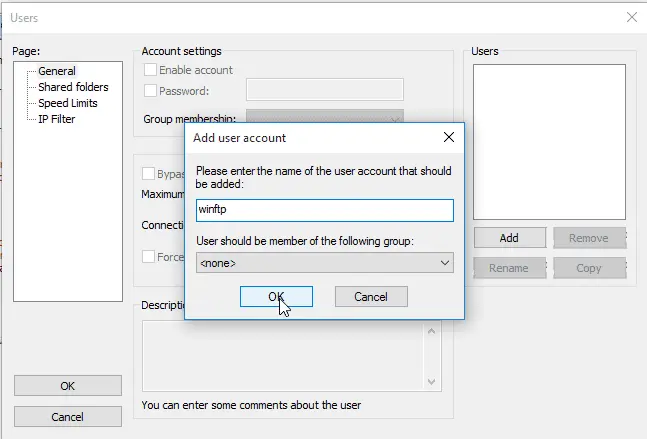
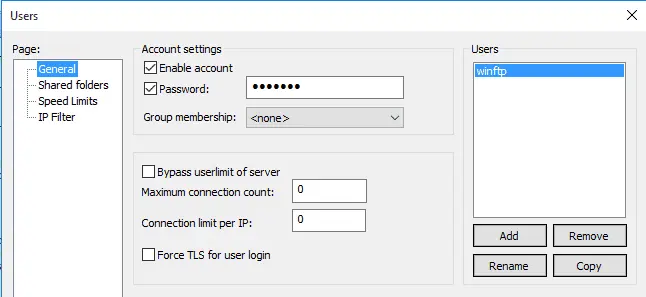
- Select the user icon followed by a click on the ‘add' button. Type your desired user account name and Press OK to continue.
- After the user account is created, enter a new password.
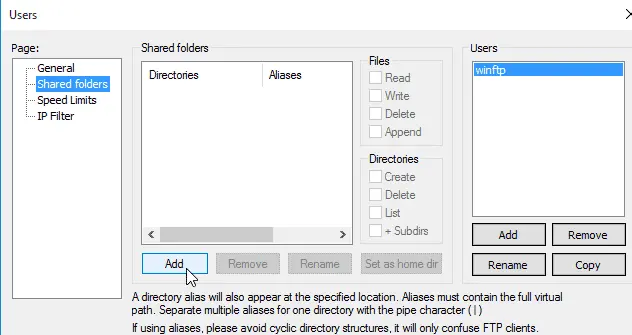
- To define a home directory for this user, you can select the ‘Shared folders' option, click on the add button to see all the folder(s) that you want to transfer.
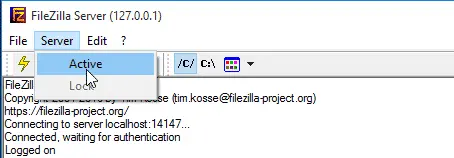
With this, the process of Installing on Windows will be completed. Please note: In case the FileZilla FTP Server gets configured to start manually during the installation, then you need to access the server using the GUI. Go to the interface of the FTP server interface and then click on Server > Activeto start the FTP service.
- Visit the official website of FileZilla or follow the link https://filezilla-project.org/download.php?type=server for Free FileZilla Server Download for Windows. As of now, the latest version of the application available for download is 1.1.0.
- Run the install file (.exe) to install the program.
- Launch FileZilla FTP Server by double clicking the icon on your desktop.
- Create a FTP site with a unique username and password to share the directory along with defining security protocols to dictate the parameters of the data transfer.
How to Configure FileZilla Server for FTP Step-by-Step?
Here's a step-by-step guide to configure FileZilla Server on Windows Machine.
- After the installation when you launch it for the first time, it prompts you to enter a password. Leave it blank and click on connect
- After the FileZilla Server window opens, click on settings, then Admin Interface Settings to set a password for FileZilla Server login. Enter desired password.
- Go to “FTP over TLS Setting”, check “Enable FTP over TLS Support” and also check “Disallow plain unencrypted (FTP)”, click on ok to save the settings.
After the initialization, it's time to configure the FTP site to host files for sharing. Below are the steps:
- Click “Edit” on the FileZilla Server window.
- Choose “Groups” or “Users”, depending on the requirements of the share. If you want to share with a user, select Users or if with a group, select Groups.
- Click “General”, and then “Add” to add groups to whom the folder will be shared.
- Click “Shared Folders” to choose the folder to share.
- Click “Ok” to finish the FTP site creation process.
The FTP server is ready to be accessed from any location. Please use hostname or IP address to access the FTP data using any FTP Client from any operating system.
How to Download and Install FileZilla Client?
Before getting into how to download and install FileZilla Client, it's important to know that there are three different versions of FileZilla Client available for download - Zipped, Installer, and Source, each designed to serve the same purposes, but in a different way. While Installer and Zipped versions only support data uploading and downloading, the Source Code lets seasoned programmers access, edit, modify, or/and compile the source code of the FTP application due to its open-source nature.
Let's first understand these versions so that it becomes easier to decide which version to choose when it comes to the FTP client.
Installer version
For starters, the installer version is the easiest and safest version of FileZilla Client to go with. With the Installer version, one simply needs to download the program and run the installer to get the program installed on their local system.
Note: This Version is not available for Mac OS or Linux.
ZIP Version
ZIP version is the go-to solution for those with unique file sharing requirements or for those who don't like installers or don't have the admin privileges to install the program. This version contains a number of files zipped into one single file. To install this version, you need to first Unzip the file using a reliable unzip tool and then run the install.exe file to set up the program.
Source Code Version
The Source Code version is by far the most advanced module that has particularly been designed to allow seasoned programmers to access, edit and modify the source code of the application along with offering the standard data transmission facility like the previous two versions.
Selecting the right version of FTP Client for download is the key to hassle-free execution, and therefore, shouldn't be taken lightly.
Download and Install
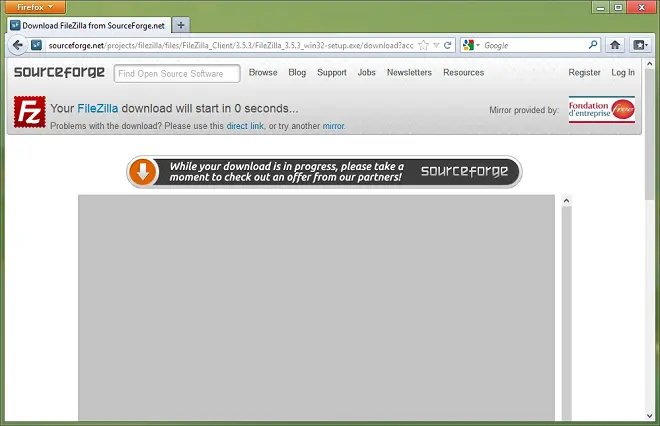
Visit the official website of FileZilla or follow the link https://FileZilla-project.org/download.php to download FileZilla Client Application. (You can select the operating system of your choice depending on the device you are using).
Save and Run
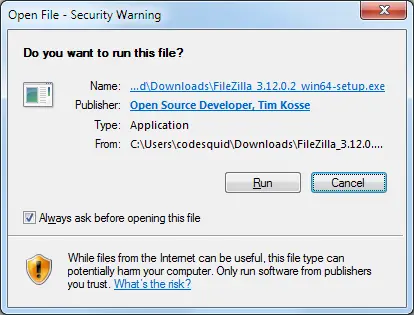
Once the file is downloaded, you need to save it. Based on the web-browser that you are accessing, you get a dropdown menu with different options for different actions. To install the FTP application, you just need to click ‘Open' or ‘Run' the file. What you should take into notice here is the fact that you may get some warning notifications highlighting that you are running a potentially malicious file as FileZilla doesn't have any software certificate/signature. However, Sourceforge is one of the most reputable platforms and a dependable source for FileZilla FTP application download and you shouldn't worry at all.
Installing on Windows Machine
For Installer Version
Please note: The given screenshots are from Windows 8. The screen layouts might appear different on different Windows Versions, but the functionality is similar for all.
You need to ensure that the Account that is being used has admin rights to install the application.
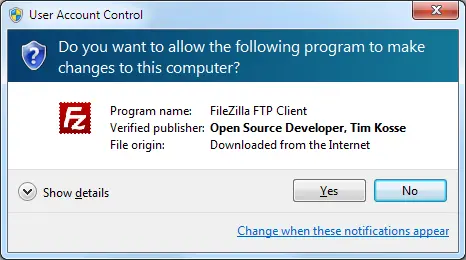
Possible Popups
Basis the version and operating system's settings, either one or both of the popups given below appear:
License Agreement
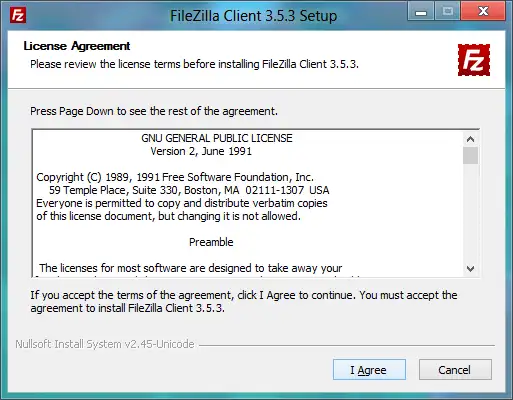
After you run the installer, you will be prompted to a new screen related to License Agreement. Give the terms of the application a thorough read and press "I Agree" if you do.
Installing Only for Me or All Users
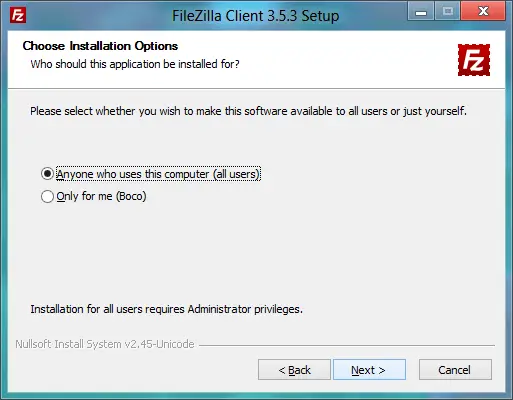
As per your requirement, you need to choose if you want to install FileZilla Client only for your profile or if the application should be accessible for everyone who uses the same computer. It also requires administrator's rights to install for all users where each user will have their own settings.
Selecting Required Components
Once it is done, you will be required to choose the components of FTP Client that you want to install. Hovering the cursor over the menu items, you will see a description of each of the components.
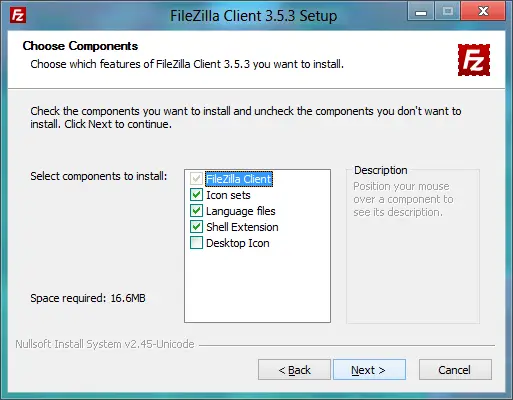
You can check (or uncheck) the items according to your specific requirements. Icon Sets allows you to pick different layouts for the in-app icons whereas additional languages grant you the freedom to use FileZilla in your selected language. Shell Extension integrates FileZilla into the Windows Explorer. Most users will go with what's selected by default here. Once you check the desired items on the menu, press ‘Next' to proceed to the next step.
Install Location
In this step, you are required to define the location on your PC and the subsequent path to install the tool. Once you are done with it, press 'Next'.
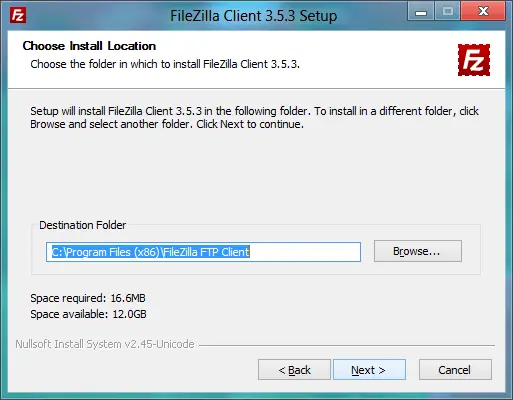
The default path is to set it up on the "Program Files (x86)" directory on Windows 64-bit while on PC running on Windows 32-bit, it will be "Program Files".
Menu Shortcuts
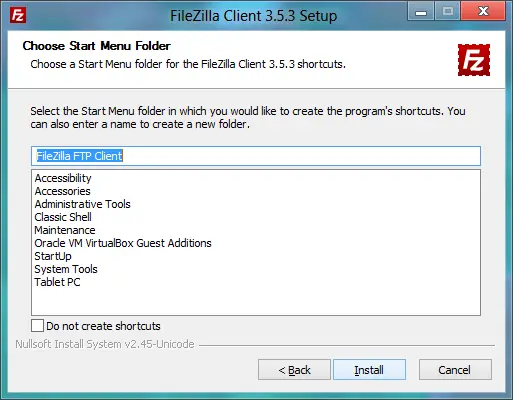
In this step, you need to decide the name of the folder with the shortcuts to FileZill. If you do not want it, you can simply jump to the next step without installing them.
Finishing installation
When you are all finished with the above given step, click ‘Next' to complete the installation process.
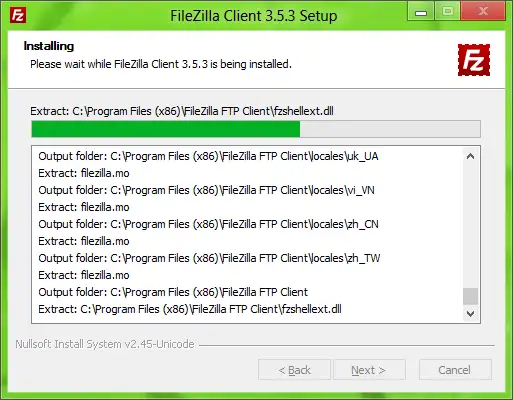
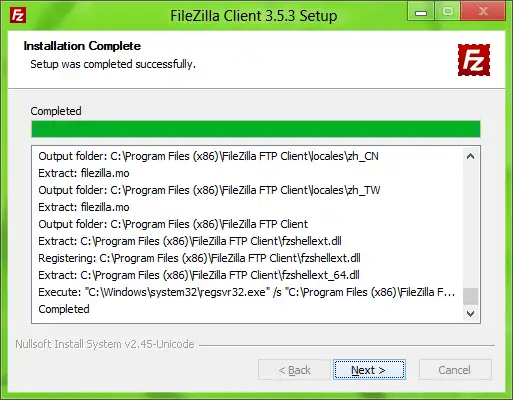
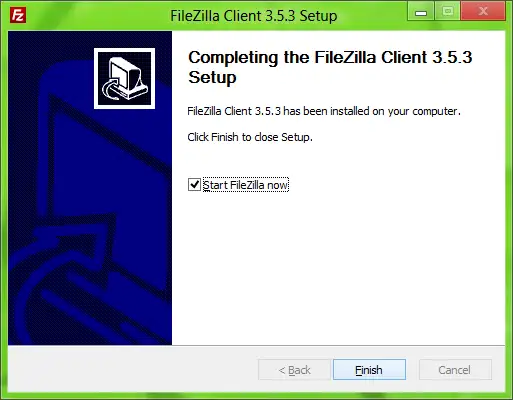
FileZilla Client installation is successfully completed. Check ‘Start FileZilla now' if you want to launch the program and click the ‘Finish' button to dismiss the wizard and get started straight away.
For ZIP Version
If you are aware about how to work with ZIP files and know how to handle directory and general files in Windows, then ZIP Version should be your go-to choice.
With the help of a reliable unzipping tool, you can extract the downloaded files to a folder on your system.
Start FileZilla by double-clicking the filezilla.exe file to begin the process. If you wish to install FileZilla on a Pendrive or any other kind of Portable Storage, you need to extract the content of the ZIP file to it. After that, you are required to create a "fzdefaults.xml" file in the same directory and that's it.
Installing on Mac OS X
Please note that the official binaries for FileZilla require OS X 10.9 or greater.
- First, download FileZilla Mac and save it on your system.
- Locate your installation file for FileZilla Client and double click on it to begin installation
- Click ‘Yes' when prompted to “Do you want to install it since it's from the internet?”
- And it will launch FileZilla Client window, please place the icon in application folder
Steps to Install FileZilla Ubuntu
It is advisable to choose the package manager of your distribution.
You can also go with precompiled binaries available with Linux OS.
Extract the files to a folder on your disk. Click ‘filezilla' executable in the bin/subdirectory to start the program.
You also have the option to compile FileZilla Ubuntu from source. However, please note that you need to install all the dependencies, which include:
- GnuTLS
- libidn (under Unix-derived systems)
- wxWidget
- libfilezilla
- libdbus (under Unix-derived systems)
- gettext (Compile time only)
In case you have used SVN repository instead of an official release to download FileZilla, then you need to install the listed dependencies:
- Perl
- Autoconf
- Libtool
- automake
Once you have installed these dependencies, you need to run autoreconf -i, and after that you can compile FileZilla by executing the following:
- #./configure
- #make
- #make install
Executing
Double-click the filezilla.exe file ("C:\Program Files\FileZilla FTP Client\FileZilla.exe" - default location for Windows) or one of the shortcuts in the start menu or on the desktop, created during the installation process. You can use FileZilla command line arguments while executing.
What are the System Requirements for FileZilla?
FileZilla Server and Client applications are not-so-resource-extensive applications. Both of the programs work pretty well even on computers with modest configurations.
Here are basic system configuration recommendations for FileZilla Server and FileZilla Client:
For FileZilla Server:
- 2GB RAM
- 1 Core of Processor
- 1 Mbps of Internet Bandwidth
- 200 MB of Disk Storage
For FileZilla Client:
- 2 GB RAM
- 1 core of Processor
- 1 Mbps of Internet Bandwidth
- 100 MB of disk space
How to Use a FileZilla Client?
Here's a quick overview on how to use FileZilla client. By default you don't have to configure FileZilla, but if you have any special requirements, then you can upgrade it as per your preferences and start working with the program.
Establishing connection with FileZilla Server
Method 1: Using the Quickconnect bar
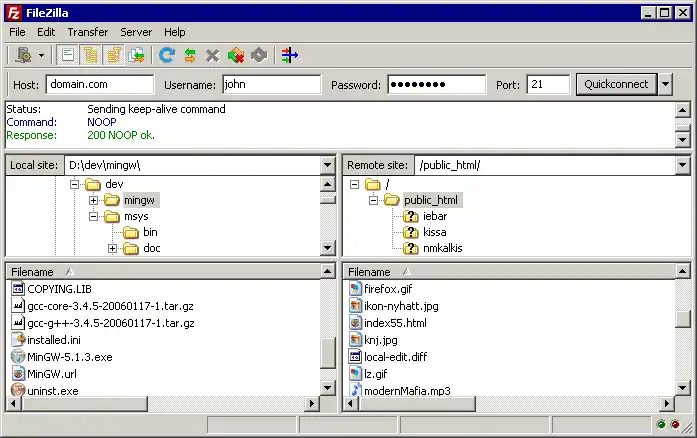
To establish connection with FileZilla, type the server's address into the host field of the Quickconnect Bar. (Refer to the image below for example).
You also need to enter the protocol along with the address if it is a special kind of server.
For SFTP servers, you need to start the address with 'sftp://' (for example: sftp://testing.com).
Add the Server's port on the port field in case it is not the default port (for FTP: port 21, for SFTP: port 22).
Enter the login credentials (if prompted), or the anonymous logon (default) will be used. Select Quickconnect or click on ‘Enter' to establish connection with the server.

It is to be noted that Quickconnect, as the name implies, is for easy and quick connections, hence you cannot change or edit the list of the quick connections, it only stores the details of the last 10 entries. You should prefer the Site Manager to store the FileZilla Server names, instead.
Quickconnect is ideal for validating the login credentials before using it on Site Manager. After connecting, you can select File -> "Copy current connection to Site Manager..." to make a permanent entry.
Method 2: Using Site Manager
You can outline particular site parameters with the help of Site Manager and connect to the desired FTP site. It helps you store the server entries along with allowing you to specify detailed parameters as compared to the Quickconnect.
Method 3: Connecting Servers in LAN (Exception)
If you wish to connect to the server in your home LAN, you can simply enter the server system's IP address. Generally, the computer name (network name) can help you get it done. If your targeted server is configured on the same system on which Filezilla is residing, you can even use localhost or 127.0.0.1 as hostname.
Navigating on the server
Once the connection is successfully established, a list of files and directories appears on the screen. On the very top of the window, the name of the existing current remote directory is given. You can see the remote directory tree below that section followed by a list of the contents of the existing directory (remote).
For making any edits or changing existing remote directory:
- Enter a directory name on the edit field and Click 'Enter', or
- Select any directory on the remote directory tree, or
- Double-click a directory in the list of the current directory contents
You should see a directory named ".." mentioned on almost every directory. You need to select this directory as it helps you move to the parent directory of the existing setting.
Also, Question Marks ("?") display on directories that you are yet to access, which signify that the FTP Client can't identify if there are sub-directories within those directories. The question marks will disappear as soon as you access that particular directory.
Directory Navigation on Local System
Navigating through FTP clients on local PCs is almost identical to navigating on web servers. By default, the local directory tree and the local directory appear on the window's left side.

Browsing in Sync
Synchronized browsing can be enabled if you have the same directory structure on web-servers and the local machine. What it refers to is that the path of navigating through the directory on one system is replicated on another system.
To activate this feature, in the Site Manager, you need to create an entry while on the Advanced tab, you need to make sure that the Default remote directory and Default local directory have the same format. You then need to select "use synchronized browsing," and save the updates and click "Connect".
Comparing Directory
For evaluating and checking differences between the files on the web-server and the local system, navigate through View > Directory Comparison, and pick from either "compare modification time" or "compare file size" and then click "Enable."
Once you enable it on the system, you get to see the differences between the same files on different systems in a color-coded format.
File Transferring
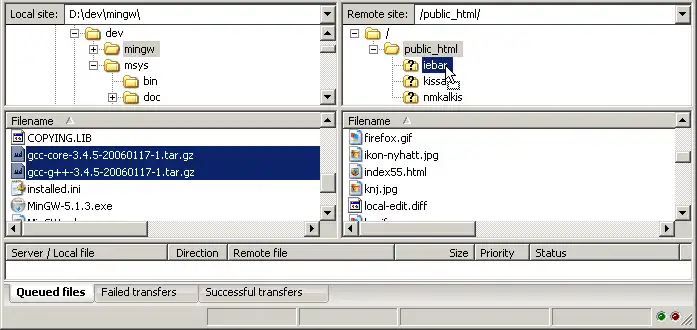
Simply double-click on the file to either upload or download. The file will then be added to the queue and the process begins automatically.
You can also choose multiple files or/and directories by right clicking on the selected items for quick uploading or downloading.
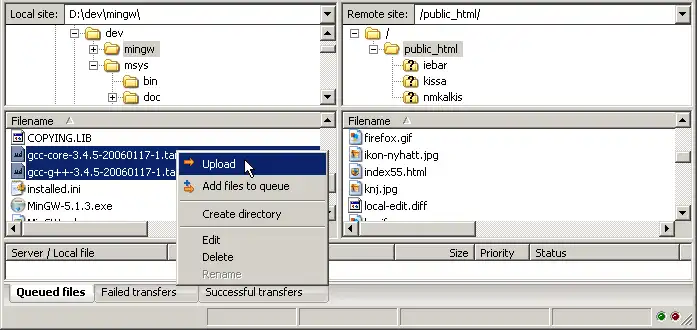
Drag & Drop option is also available for uploading and downloading the files. All you need to do is drag and drop the selected files directly into the queue and press the button to transfer the files.
Another way is to select a file by clicking the same and then dragging it to any directory in which you wish to save the file. When you hover the cursor over the directories, they'll appear highlighted and the file will be stored in the directory as soon as you let go of the mouse button.
What are the Special Considerations during File Transfer?
FTP application has a defined session-based operation and requires a couple of sessions. While the first session is entirely consumed in server browsing, the second one is used for transferring files, giving users the freedom to navigate from feature to feature or the server even when the files are being transferred.
Minimizing connections for servers configured incorrectly
In case you get an alert reading “Error 421: Too many connections from this IP (
The best way to resolve it is by contacting the server admin and getting the server configured correctly using the admin's account.
On the other hand, there's another way which can help you get it done without requiring admin accounting. Here's a step by step process for the same.
1. Access Site Manager
2. For that server, create an entry with the essential details
3. Select 'Transfer Settings'
4. Check the 'Limit number of simultaneous connections' option
5. Specify the expected limit by filling 'Maximum number of connections' field
After this, whenever you want to connect through the entry made on Site Manager, the number of connections will be restricted according to your requirements.
Also, it is to be noted that if the desired number of connections is set to just 1, then it may restrict the user browning the server while data is being transferred.
What are Some Unique Features of FileZilla?
Both the Server and Client versions of the FTP software come loaded with a wide range of tools and options that allows them to synchronize and function in tandem for seamless communication and data transfer. While the Server software supports FTP as well as FTP over TLS to establish secure, encrypted connections, the Client version has dynamic functionalities and tools that help users get the easily move their desired files to and fro the web servers.
Given are the major features and functionalities of FileZilla Server as well as FileZilla Client.
1. Multi-site Operations:
With FileZilla Server, users can create multi-site for many concurrent file transfer operations. This becomes extremely handy to businesses having to transfer many files at the same time. With a single control point, all operations take place with no hassle.
2. Autoban:
This feature allows the owner of a FTP server to ban IP addresses that are used by intruders to steal data. It immediately blocks any chances of misuse of files.
3. Customized Security:
At the server end, the owner of the files can define what security measures a site will take to transfer the data. There are a choice of security protocols to be used to secure the data while it is being transferred.
4. Logging:
The logging feature on FileZilla is extremely important to track and monitor your historical files transfer operations. This further helps to find errors if there's any issue with the FTP sites.
5. Encryption:
The site owners can prefer to use encryption for files to add further security to the data transfer process. In this case, the receiver will only be able to decrypt the file, eliminating any chances of data tampering in the mid-way of transfer.
FileZilla Client Features
1- Intuitive Graphical User Interface:
The user-friendly GUI of FileZilla Client is highly intuitive and is amongst the major USPs of the FileZilla FTP Client utility and understandably so. Users, even with little or no technical expertise can navigate through the FTP location and download the right set of data and files from the Server with just a few clicks. Users will be able to customize their data transmission parameters.
2- Bookmarking:
For a site that needs to be connected very frequently, users will be able to bookmark them for easy and fast access over time. In this feature, the application will save the site parameters and connect automatically when the request is made.
3- Cross-platform Support:
FileZilla Clients work on almost all available platforms like: Linux, Unix, Mac as well as windows. So, it gives flexibility to the environment having diverse technologies across.
4- Support of Security Protocols:
FileZilla Client supports all sorts of security protocols like TLS, SSL, etc, giving a secure way to transfer data from one location to another. FTP is considered to be a vulnerable application, however, inclusion of these security features will enhance the security standard of the file transfer operations.
5- Compare to Find Latest Version:
Users can compare the different versions of data to make sure that they have access to the latest copy of the data. This feature is not generally available with other free FTP services. Comparison eradicates the chances of data duplication.
6- Remote File Editing:
Users have the option to edit or modify files from remote locations using FileZilla Client without having to download them.You can simply select the files that you want to edit and can make the required changes in real-time.
7- Multi-language Support:
FileZilla Client supports almost all the major languages in the world and users can change the language of FileZilla to suit their understanding. So, the users will be able to download files even if the server is configured in a different language.
8- Bandwidth Management:
Depending on the bandwidth and requirement, FileZilla Client helps to configure bandwidth management options to adjust the pace for data transmission.
What to consider while using FileZilla?
When it comes to FileZilla Server, FileZilla Client andFileZilla Pro, all of these FileZilla FTP applications have different technical parameters and functional capabilities to execute different aspects of online data sharing.
Here are the main pointer that users need to keep in their mind when using FileZilla applications:
a) Creating Secure FTP:
FTP is a vulnerable protocol and requires strict security to protect sensitive data while being transferred to the other location. Security protocols like TLS, SSL, etc. enforce additional security layers to safeguard files from any mishappenings.
b) Setting User Permissions:
On a multi-site FTP server, setting user rights and permissions happen to be one important factor as they help in ensuring access levels for different types of data and requirements. Right set of permissions help safeguard confidential information from getting into the wrong hands.
c) IP Filters:
This feature is used to enhance the security of the FileZilla site by banning IP addresses involved in invalid attempts. By doing this, you can eliminate any chances of FTP sites from getting compromised.
d) Download:
You should not download FileZilla Client from another source than FileZilla official website. There are many attempts of phishing tools bundled with the FileZilla Client and used to steal data while downloading from unverified sites.
What are the Pros and Cons of FileZilla?
Both FileZilla Server and FileZilla Client come bundled with a variety of features, tools and utilities that combinedly make FileZilla a go-to solution for File Transfer Protocol. However, just like every other software solution, these close-to-perfect FileZilla FTP Server and Client have certain limitations and disadvantages to them, which are discussed in detail below.
The Most Significant FileZilla Server Advantages
1. No Cost:
Free FileZilla Server download is perhaps the single-most unique advantage of the FTP server application. FileZilla Server comes as a GNU license and one doesn't need to pay anything to download and configure FTP. You can customize it without any hassle to fit into our exact requirements.
2. Easy-to-Use:
While system default FTP utilities are difficult to configure and manage, FileZilla Server has an easy-to-use graphical user interface to configure and manage the file transfer operations. Even the basic level users, with some basic understanding of the online file transfer process can use the application to host and access the data.
3. Multi-language Support:
In addition to English, FileZilla Server supports some of the most popular languages in the world, including Spanish, French, German, French, Japanese, etc. The multi linguistic aspect makes this free-to-use FTP server simpler and more convenient to use.
4. Cross-platform:
FileZilla Server supports Clients from almost all platforms - Windows, Mac OS, Linux, making it one of the comprehensive FTP server applications.
5. Security:
It supports major security protocols that are used to secure the data communication methods.
The Major Disadvantages of FileZilla Server
Bundled with Unwanted Software:
The hosting site of FileZilla, the Sourceforge.net, initially packed the FileZilla application with quite a few unwanted applications with some of them allegedly classified as malicious software. Many FileZilla users also reported performance issues and other system-related problems after they installed the FileZilla application.
Advertisements:
FileZilla update comes with adwares that diverts the attention of users during application update. Adwares are hugely criticized as unwanted distractions imposed on users for using the free version of FileZilla.
No Automation:
The FTP doesn't offer any command line arguments for automatic file transfer. There are quite a few FTP clients which offer automation.
The Major Advantages of FileZilla Client
Open Source FTP Client Utility: As discussed above, FileZilla Client is an open source, free-to-use application that supports FTP over TLS and SFTP, among many other protocols along with providing some really quick and secure solutions for data transfer.
Pro Version: FileZilla Pro - the paid version of the FileZilla FTP Client, provides users with additional features, tools and utilities to help streamline and speed up the file transfers and data exchange process. It is available as an one-off purchase or a subscription-based model and depending on your unique requirements, you can choose either.
Easy Access to FTP Servers:
FTP clients are compatible with the major operating systems and users, irrespective of the OS or the device they are using, can seamlessly connect to the FileZilla Server Windows to access and download the desired files.
Simple and Quick:
While the software comes loaded with a bunch of features, they all are designed keeping user experience in mind. It means users can easily access the application, connect to the targeted server and execute file transfer.
Seamless Connection:
Users can simply fill the required details on the software to create a FileZilla connection. Once you have filled in all the details, it takes just a few seconds to establish the connection.
Cons of FileZilla Client
Some Complex Features:
while the entire FileZilla Client Windows, Mac and Linux versions are designed to offer easy and quick solutions, there are a few features, which require special understanding and chances are, a beginner might find the tool a little difficult to understand.
Access to Extra Downloads:
After the FTP Client gets installed and configured, users have the access to download additional files. However, it's not a big disadvantage as you, as a user, have the option to disable it.
What are the Alternatives of FileZilla?
File Transfer Protocol technology has been around for some decades and today there are quite a few client-server architecture-based utilities and are ideal alternatives to FileZilla. While some are enterprise licensed while others belong to the open-source family, and hence, no charges.
Given are some of the most popular alternatives of FileZilla:
a) War FTP Daemon:
It's one of the free and popular FTP servers and is considered to be one of the fierce competitors of FileZilla. It is hailed as one of the most secure FTP servers. It is a feature rich FTP utility and is already loaded with all required features to meet any level of data transfer requirements. But no regular updates are raising doubts about its competence level since the arrival of modern-day business needs changes and security threats. Since it is only available for windows operating systems, it fails to meet the expectations of a network with hybrid operating systems.
Follow the given link to download the latest version of War FTP Daemon: https://war-ftp-daemon.software.informer.com/1.6/
b) Crush FTP:
It's a proprietary application but due to some unique features, it is very popular in the industry. The major features of CrushFTP are: vast support of protocols, multihoming, and hot configuration changes. Multiple plugins to meet some specific demands can be added to enhance the capabilities of this excellent FTP application. It's pricing module is the only reason of being criticized because it is always said that the developers focus more on enterprise Clients.
Click the link https://www.crushftp.com/download.html and choose from the Windows, Mac OS and Linux Package to download.
c) VSFTPD:
It's a free, Linux-based FTP daemon that comes default with the linux operating systems. It's one of the most comprehensive FTP applications that if managed well, is able to work in any circumstances. Since it is a command-line utility, it requires expertise to configure and manage FTP operations. It is not considered to be the best option if we want to create multi-site file transfer operations.
Download VSFTPD by clicking the given link https://security.appspot.com/downloads/vsftpd-3.0.5.tar.gz.
How to Ensure FileZilla Server Data Security?
FileZilla works pretty well with secure protocols like: SSL, TLS but there are some security measures that, if taken, can eliminate the chances of data breach. Below are the security recommendations for FileZilla Server as well as Client.
Here's how FileZilla Server ensures data security:
a) Saved Password:
Since the administrator and users passwords are kept in XML file, the administrator of the FTP server must ensure that there's strict security measures in place to protect the file.
b) Right security protocol:
There are a variety of security protocols we can use with FileZilla Server to share files, and the administrator of the site must use the right protocols for right purposes. Like if an intranet user wants FTP access, the administrator must use FTP without any security protocol for enhanced speed.
c) Complex Passwords:
The administrator of the FTP site must ensure that the users follow predefined complex passwords to protect from any security threat. Commonly used passwords should not be used since they are more prone to hack.
FileZilla Client Security Recommendations:
a) Saved Password:
Users should not save passwords for the FileZilla FTP Client at their preference since saving passwords can land you in trouble. Saved passwords give access to our confidential data to any intruders. Depending on the severity of the data, one should manually enter the password every time they login.
b) Importance of Logs:
Users should take measures to protect the logs that get generated while data transmission happens. This lets us track historical activities of the data and saves us from many issues.
c) Nature of Downloaded Data:
Sometimes it is seen that hackers tend to use FTP to get into systems by forging a fake download. So, before downloading anything from FTP location, please validate the authenticity of the location and data.
How to Backup a Website Using FileZilla?
Let's take an example of Godaddy hosting to demonstrate a process of backing up the entire website using FileZilla. Please follow the steps to do it:
a) Please login to your Godaddy account
b) From all hosting accounts windows, please choose settings
c) It will bring another window, please click on “SSH & SFTP”
d) Please note the hostname, user name, and password from the records
e) Launch FileZilla Client by double clicking on FileZilla Client icon
f) In host name option at the top, enter host name, followed by user name and password
g) Click on “Quickconnect” to connect to the hosted site data
h) After it's connected, on the right hand side, you will be able to see the entire data of your site
i) On the left side of the panel, choose your folder to save the backup
j) Select all from right side of the panel and drag it to the left side of the panel to transfer
Though the website backup of other hosting providers will be different but the process would remain the same after you are able to fetch the user name, host name, and the password.
How to Access FileZilla Server from Outside Network?
It requires a small setting change in the router and FTP server will be accessible from outside of the network. To make this happen, please follow the below steps:
a) Access the router's console by typing the default gateway address over any browser
b) Find NAT or WAN setting
c) Choose port forwarding
d) Enter the forwarding parameters like given below
Service Name: give any desired name
Port Number: 21
IP address: enter your IP
Post Number: again 21
Protocol: TCP
e) After you save the setting and reboot the router, you will be able to access FTP server over the internet
Conclusion
FileZilla is basically used for downloading and uploading files to and from remote locations. FileZilla has two applications, one is known as FileZilla Server and the other is called FileZilla Client. FileZilla Server is used to host files to be accessed from multiple locations and FileZilla Client is used to download files that are shared with a FTP from any locations. The Pro version of FileZilla is used for commercial purposes and it contains exclusive support from FileZilla to customize it to suit any business needs.
FileZilla can be used with multiple perspectives. For a secure file transmission over a wide area network, one can use SFTP while for intranet users, just FTP will give a tremendous amount of speed during data transfer. It becomes extremely handy when the users are not technically sound, its graphical user interface guides users to share and download files using respective applications. It is also preferred in the infrastructure which has multiple platforms to transfer files and its cross-platform nature allows users to seamlessly transfer files without any limitations.
FileZilla: Frequently Asked Questions
Is FileZilla Safe?
FileZilla is absolutely safe if it's used with secure protocols and follows some security recommendations from FileZilla. SFTP should be used.
How to Automate File Transfer in FileZilla?
FileZilla doesn't allow you to automate your file transfer operations, however, you can achieve this by creating a custom script to do so. There's an alternative to FileZilla, called Winscp, that allows you to automate your file transfer by scheduling it at a defined time.
Is FileZilla Malware?
It's not Malware at all. Instead, it's a free FTP to help users to transfer files in a secure way. Some initial releases were reported to be shipped with adwares but Fileilla acted on those reports and now it's absolutely safe to use.
What Is FileZilla Server and Client?
FileZilla Server and Client are free FTP utilities used to share and download files respectively. Both are free of cost and can be downloaded from the official website of FileZilla.
Where Does FileZilla Store Passwords?
It is stored in the user's profile and can be fetched if the password is forgotten. The location to retrieve the saved password would be:
User Profile/AppData\Roaming\FileZilla\RecentServers.xml
Do I Need a FileZilla Client or Server?
Yes, you need it if you want to share files with other users outside your network securely. However, if you need other's shares to download, you will require a FileZilla Client.
How to Use FileZilla Server for FTP?
After you downloaded FileZilla Server from the official website of FileZilla, you need to install it for further proceedings. You can then configure your FTP site by adding users and folders.
How to Access FileZilla FTP Server from Browser?
You can type the details of your FTP server with parameters to connect to the FileZilla Server from the browser.
FTP:\\IP of FTP server:port number
How to Add an SSH Key to FileZilla?
Find the SSH keyfile firstly from your hosting site by going to settings option. Once you have the key, please launch FileZilla and go to the site option. By filling all other details, you can upload your file downloaded from the hosting provider.
How to Connect SFTP FileZilla?
There's a very easy process of configuring your SFTP and connecting to a SFTP site. You can go to the site settings option and choose SFTP as protocol to have your SFTP site configured.
How to Create an FTP Account in FileZilla?
Click on “Server”, then 'Configure', it will pop-up a window, please choose user and then add user to create FTP account in FileZilla.
How to Install FileZilla in Ubuntu?
FileZilla Client for Ubuntu is available, you can download it from FileZilla website. Once you download it, kindly proceed with the installation guide mentioned below:
How to Set up a Secure FTP FileZilla Server?
Secure FTP FileZilla Server can be configured using SFTP as a communication protocol while setting up a site.
How to Setup FTP Server Using FileZilla?
To set up an FTP server using FileZilla, the FileZilla application can be downloaded from the official website of FileZilla. To complete the setup, please follow below steps:
How to Unzip a File in FileZilla?
There are a number of third-party utilities available out there with the help of which you can unzip files in FileZilla.
Is FileZilla HIPAA Compliant?
No, FileZilla is not HIPAA compliant. HIPAA, which stands for Health Insurance Portability and Accountability Act, is a kind of certificate that is mostly used for hardware resources and data centre infrastructure as a whole and not for software, applications, tools, or utilities.
I cannot connect to Server FileZilla. What should I do?
It may be due to your FileZilla Server service not running. You can start it by double clicking on the “Start FileZilla” icon placed at the desktop.
Does FileZilla Work on Mac?
Yes, it absolutely works fine on Mac. You can download FileZilla for Mac from the official website of FileZilla and start using it without paying anything.
How Do I Use FileZilla FTP?
You can use FileZilla FTP by downloading the software from the website. You can then enter required information to proceed with it.
How to Connect cPanel to FileZilla?
You can connect the cPanel of FileZilla Server from a web browser. For this, you need to enter
FTP:\\IP of the server
How to Connect FileZilla to Wordpress Localhost?
You can connect to Wordpress localhost with FileZilla. For this, you need to launch a FileZilla Client and enter the details of the Wordpress site. Once you click on Quickconnect, you will see your Wordpress files on the right side of the pane.
How to Download Files from FTP Server Using FileZilla?
You can simply enter the FTP server credentials set for the user and click on Quickconnect to connect the server. After it's connected, you will be able to see the FTP files that you have access to download. You can select those files and drop them into the left side of the pane.
How to Download from FileZilla?
Select your files from the right side of the FileZilla Client window and drop it to the left side that is the location of your local computer.
How to Find a Public_html Folder in FileZilla?
It is required when you try to download some files from a web hosted platform. For this, you need to find the address along with other details of the host where your website is hosted. After you have all this information, you can launch a FileZilla Client and supply the above mentioned information to connect to the site. Once it is connected, you will be able to see all hosted files along with the Public_html folder. You can even search for remote files at the right side of the pane.
How to Host Wordpress Websites Using FileZilla?
For this, you again need to find the Wordpress hosting details like host name, user name, password etc. Then, please launch FileZilla Client and enter the above information. You can now select the Wordpress files from the left pane and drop them at the right pane.
How to Install Wordpress Theme FileZilla?
Wordpress themes can't be directly installed using FileZilla, however, themes can be uploaded to the Wordpress site using FileZilla Client. Please follow the below steps to accomplish this:
TO DO STEPS LINK REQD
How to Open FileZilla?
You can double click on the icon of FileZilla placed at your desktop to open FileZilla.
How to Run FileZilla?
For FileZilla Server, you need to double click on the “Start FileZilla” icon at your desktop. It will run FileZilla on the computer.
How to Search in FileZilla?
FileZilla is widely known for its remote searching capabilities. Once you connect to a FTP site, you can use the right pane search option to search remote files.
How to Setup FileZilla Server Behind NAT?
There's a very easy process to setup FileZilla Server behind NAT. You can simply do it by
How to Upload Files Through FileZilla?
Launch FileZilla Client, then from the left side of the pane, navigate to your destination folder where your files to be uploaded are residing. Now, enter the FTP server details to connect to the remote server. Once it is connected, please select your files from the left pane and drop it to the destination folder.
How to Upload Files to 000webhost Using FileZilla?
You can connect to 000webhost site by entering hosting details like host name, user name, and password on FileZilla Client. You can then drag and drop your files from left to right in the pane.
How to Use FileZilla in XAMPP?
FileZilla comes bundled with Xampp and just needs a start of service using the Xampp panel. Once it is started, you can proceed to create users and allow users to access files.
How to Use FileZilla Minecraft?
Login to the Multicraft account and find your login details like user name, host name, and password. After you launch the FileZilla Client, you can enter the Multicraft details to connect the Minecraft server. It is once connected to the server, you can view and download the files from the right side of the pane.
What Is the Host on FileZilla?
Host is the computer that is having FileZilla installed. It is sometimes called the host and it's named by host name. It's IP address would be: 127.0.0.1.
Can I Change File Permissions to FileZilla?
Yes, you can. To change permissions, you need to launch FileZilla Server by double clicking on the icon placed at the desktop. Once you launch it, please click on Configure, then Users and then define the new permissions settings as per requirement.
How to Backup Wordpress Site With FileZilla?
You can first zip the file at your Wordpress hosting site, then use the hosting site's host name, user name, and password to download the backup file at your local computer.
How to Connect to a Server With FileZilla?
To connect to a server with FileZilla, please use the above mentioned steps.
How to Connect to VPS With FileZilla?
No, a VPS can't be connected to Filzilla. However, you can install FileZilla on a VPS or if a VPS is configured as a FTP server, you can use FileZilla Client to connect to it.
How to Host a Website Using FileZilla?
To host a website using FileZilla, you need to archive (zip) your files on a local computer. Then, launch FileZilla Client and after entering all the details of the hosted server, you can upload your files there. You can then extract it and use it to host your website.
How to Upload to FileZilla?
To upload to FileZilla, you need to launch FileZilla Client and then transfer by dragging and dropping from left to right pane.
How to Use FileZilla with PS3?
Once the FileZilla Client is launched, in the host name, please enter PS3 hostname and hit Quickconnect. You will be able to see files at the right side of the pane.
Which FileZilla Do I Need?
If you need to host files to transfer them to another location, you can use FileZilla Server. While if you need to receive files from other FTP sites, you need to use FileZilla Client.
I'm not able to open Data Connection for transfer of FileZilla. What should I do?
This error comes when the firewall port of data connection is not opened. You can simply go to the FTP server and open it to work fine.
How Does FileZilla Work?
FileZilla works with two applications, FileZilla Server and FileZilla Client. FileZilla Server is used to host the data while the Client is used to download the data.
How to Backup FileZilla?
You can't directly use FileZilla for backup. But you can zip your files and transfer it to somewhere else for a backup of your data.
How to Backup FileZilla Server Settings?
You can click on File and choose export to backup FileZilla Server settings. You can choose the destination folder to save your backup.
How to Backup My Website Using FileZilla?
You can't directly backup your website using FileZilla but you can definitely transfer your hosted files from the hosted server to your local computer using FileZilla. For this, you will require a hosted server address, user name, and password.
How to Connect FileZilla Server to Client?
To connect a FileZilla Server using a Client, one needs to enter the IP address of FileZilla Server, user name, and password. After the details are supplied, please click on Quickconnect to connect the server.
How to Create a FileZilla Account?
If you want to create a FTP server user account, please go to Server, then configure, and then clicking on Users option, you will be able to add users. However, if you want to create a user on FileZilla website, please go to the FileZilla official website and create a user.
How to Edit Files in FileZilla?
You can download the files at your local computer to edit. For this operation, you need a FileZilla Client to have access to the remote FTP site.
How to Extract a Zip File in FileZilla?
FileZilla itself doesn't allow any files to be extracted. However, you can extract prior to upload or after downloading the files.
How to Extract Zip in FileZilla?
You have to first download the zip file from the FTP server and please use below steps to extract it.
How to Get FTP Password from FileZilla?
You can go to the below destination to retrieve your password if that is lost.
User Profile/AppData\Roaming\FileZilla\RecentServers.xml
How to Host Websites Using FileZilla?
You can use FileZilla to transfer hosting files from a local computer to the hosted server. For this, you need the hosted server IP address, user name, and password. You can then transfer the files to the hosted server and then proceed with other hosting formalities.
How to Import an XML File in FileZilla?
Entire FileZilla settings can be imported to FileZilla to restore the setting of any previous FileZilla transfer operations. To do this, please click on Menu, then choose imports and locate your XML file to complete the process. For the detailed step by step guide, please refer to the below link:
TO DO STEPS
How to Install WordPress through FileZilla?
You can't use FileZilla to install Wordpress, however, you can definitely upload your files to a Wordpress hosting site. You can similarly download your Wordpress site files using FileZilla. For this, you will need to find the hosting server host name, user name, and password. Please use below steps to complete the operations:
TO DO STEPS
How to Set up Secure FTP Server FileZilla?
To set up a secure FTP server using FileZilla, you need to create your FTP site using TLS security protocol for data transfer. You can alternatively use custom ports instead of the default to further tighten the security. Complex passwords can also add up some sorts of security to the data transmission process.
How to Upload an Asp.Net Website Using FileZilla?
You can publish your Asp.Net website using any location of the system. Now, copy all the files from the same location and upload them using FileZilla to your hosted server. Please refer to the below link for a detailed guide with a video:
TO DO STEPS


